How to Seal Concrete Patio: A Comprehensive Guide to Protection and Longevity
A concrete patio is a fantastic addition to any home, providing a versatile outdoor space for relaxation, entertaining, and enjoying the fresh air. However, concrete is porous and susceptible to damage from weather, stains, and everyday wear and tear. That’s where sealing comes in. Knowing how to seal concrete patio correctly can significantly extend its lifespan, enhance its appearance, and protect it from costly repairs. This comprehensive guide will walk you through the process, from understanding the benefits of sealing to choosing the right sealant and applying it like a pro.
Why Seal Your Concrete Patio?
Before diving into the ‘how,’ let’s explore the ‘why.’ Sealing your concrete patio offers several key advantages:
- Protection from the Elements: Rain, snow, ice, and UV rays can all degrade concrete over time. Sealing creates a protective barrier against these elements, preventing cracking, spalling (flaking), and discoloration.
- Stain Resistance: Concrete is highly porous, meaning it easily absorbs spills like oil, grease, and wine. Sealing prevents these substances from penetrating the surface, making cleanup a breeze and preventing unsightly stains.
- Increased Lifespan: By protecting against damage, sealing significantly extends the life of your concrete patio, saving you money on repairs or replacement in the long run.
- Enhanced Appearance: Sealants can enhance the natural color and texture of your concrete, giving it a richer, more vibrant look. Some sealants even offer a glossy or matte finish to suit your aesthetic preferences.
- Reduced Maintenance: A sealed concrete patio is easier to clean and maintain than an unsealed one. Regular sweeping and occasional washing are typically all that’s needed to keep it looking its best.
Choosing the Right Concrete Sealer
Selecting the appropriate sealant is crucial for achieving optimal results. Several types of concrete sealers are available, each with its own strengths and weaknesses. Here’s a breakdown of the most common options:
Acrylic Sealers
Acrylic sealers are a popular choice due to their affordability and ease of application. They provide good protection against water and stains and are available in a variety of finishes. However, they are less durable than other types of sealers and may require more frequent reapplication. They are a good choice when learning how to seal concrete patio for the first time.
Penetrating Sealers
Penetrating sealers, such as silane and siloxane sealers, penetrate deep into the concrete pores, creating a waterproof barrier from within. They don’t change the appearance of the concrete and are highly durable, making them a good choice for high-traffic areas. They are less effective against stains than film-forming sealers.
Epoxy Sealers
Epoxy sealers are extremely durable and resistant to chemicals, making them ideal for garages and workshops. They provide a high-gloss finish and are available in a variety of colors. However, they can be difficult to apply and are not as UV resistant as other types of sealers. They are not generally recommended for outdoor patios.
Polyurethane Sealers
Polyurethane sealers offer excellent abrasion resistance and are highly durable, making them a good choice for high-traffic areas. They are also UV resistant and available in a variety of finishes. However, they can be more expensive than acrylic sealers. When thinking about how to seal concrete patio for heavy use, polyurethane might be the answer.
Considerations When Choosing a Sealer:
- Traffic Level: High-traffic areas require more durable sealers like polyurethane or epoxy.
- Climate: In areas with harsh winters, choose a sealant that is resistant to freeze-thaw cycles.
- Desired Appearance: Consider whether you want a glossy, matte, or natural finish.
- Budget: Acrylic sealers are the most affordable option, while polyurethane and epoxy sealers are more expensive.
Tools and Materials You’ll Need
Before you start sealing your concrete patio, gather the necessary tools and materials:
- Concrete Cleaner: Choose a cleaner specifically designed for concrete.
- Concrete Sealer: Select the appropriate sealant based on your needs and preferences.
- Garden Hose with Spray Nozzle: For rinsing the patio.
- Stiff-Bristled Brush or Broom: For scrubbing the concrete.
- Paint Roller or Sprayer: For applying the sealant. A sprayer provides a more even coat.
- Paint Tray: If using a roller.
- Painter’s Tape: For masking off areas you don’t want to seal.
- Safety Glasses and Gloves: To protect your eyes and skin.
- Optional: Pressure washer for deep cleaning.
Step-by-Step Guide: How to Seal Concrete Patio
Now, let’s get to the actual sealing process. Follow these steps for a successful outcome:
Step 1: Prepare the Surface
Proper surface preparation is crucial for ensuring the sealant adheres properly. Start by removing all furniture, plants, and other items from the patio. Then, thoroughly clean the concrete to remove any dirt, debris, oil stains, or existing coatings.
- Sweep the Patio: Remove loose dirt and debris with a stiff-bristled brush or broom.
- Clean the Concrete: Apply a concrete cleaner according to the manufacturer’s instructions. Use a stiff-bristled brush to scrub the surface, paying particular attention to stained areas.
- Rinse Thoroughly: Rinse the patio thoroughly with a garden hose to remove all traces of the cleaner. A pressure washer can be used for a deeper clean.
- Address Oil Stains: For stubborn oil stains, use a degreaser specifically designed for concrete. Follow the manufacturer’s instructions carefully.
- Allow to Dry Completely: Allow the concrete to dry completely before proceeding to the next step. This may take 24-48 hours depending on the weather conditions. The concrete must be dry for the sealant to adhere properly.
Step 2: Mask Off Areas
Use painter’s tape to mask off any areas you don’t want to seal, such as adjacent walls, landscaping, or decorative elements. This will help you achieve a clean and professional finish.
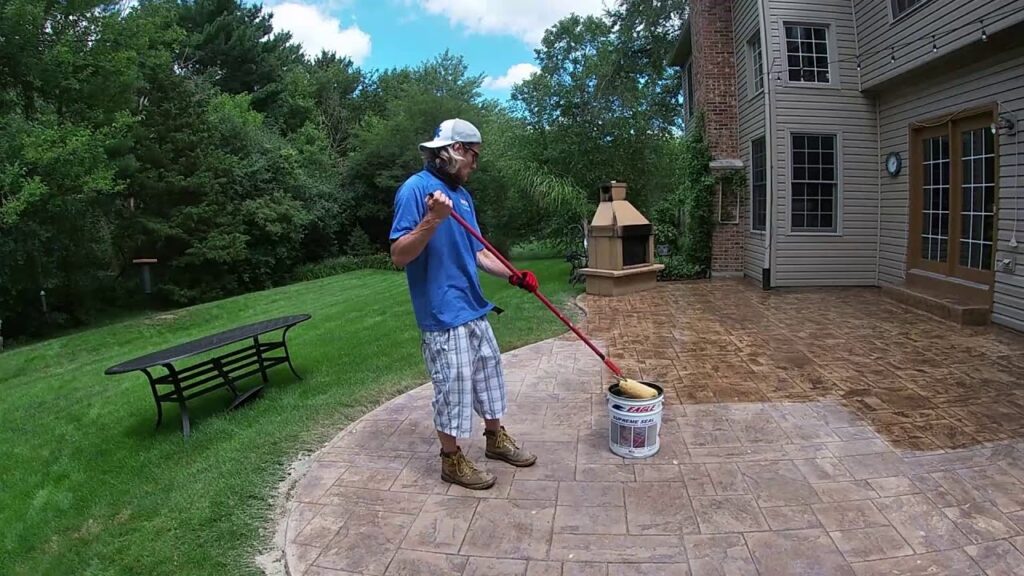
Step 3: Apply the Sealer
Now it’s time to apply the sealant. Follow the manufacturer’s instructions carefully, as application methods may vary depending on the type of sealant you’re using.
- Pour the Sealer: Pour a small amount of sealant into a paint tray (if using a roller) or into the sprayer.
- Apply Evenly: Apply the sealant in a thin, even coat, using a roller or sprayer. Overlapping each pass slightly to ensure complete coverage. Avoid applying too much sealant, as this can lead to bubbling or peeling.
- Work in Sections: Work in small sections to prevent the sealant from drying before you have a chance to spread it evenly.
- Apply a Second Coat (Optional): Some sealants require a second coat for optimal protection. If required, allow the first coat to dry completely before applying the second coat.
Step 4: Allow to Dry and Cure
Allow the sealant to dry and cure completely according to the manufacturer’s instructions. This may take several hours or even days, depending on the type of sealant and the weather conditions. Avoid walking on the patio or placing any furniture on it until the sealant is fully cured.
Maintaining Your Sealed Concrete Patio
Once your concrete patio is sealed, proper maintenance is essential for preserving its appearance and extending its lifespan.
- Sweep Regularly: Sweep the patio regularly to remove dirt, debris, and leaves.
- Wash Periodically: Wash the patio periodically with a mild soap and water solution. Use a soft-bristled brush to scrub the surface.
- Clean Spills Immediately: Clean up spills immediately to prevent staining.
- Reapply Sealer: Reapply the sealant every 1-3 years, depending on the type of sealant and the traffic level.
Troubleshooting Common Problems
Even with careful planning and execution, problems can sometimes arise when sealing a concrete patio. Here are some common issues and how to address them:
- Bubbling: Bubbling can occur if the sealant is applied too thickly or if the concrete is not completely dry. To fix bubbling, scrape off the affected area and reapply the sealant in a thin, even coat.
- Peeling: Peeling can occur if the sealant is not properly bonded to the concrete surface. This can be caused by inadequate surface preparation or using the wrong type of sealant. To fix peeling, scrape off the affected area and reapply the sealant after properly preparing the surface.
- Discoloration: Discoloration can occur if the sealant is exposed to harsh chemicals or UV rays. To prevent discoloration, choose a sealant that is UV resistant and avoid using harsh chemicals on the patio.
When to Call a Professional
While sealing a concrete patio is a DIY-friendly project, there are times when it’s best to call a professional. Consider hiring a professional if:
- You’re not comfortable working with chemicals.
- You have a large or complex patio.
- You’re dealing with severe staining or damage.
- You want to ensure a perfect, long-lasting finish.
Knowing how to seal concrete patio is essential, but knowing when to defer to an expert is equally important. A professional concrete contractor will have the experience and expertise to properly assess your patio and recommend the best sealing solution.
Conclusion
Sealing your concrete patio is a worthwhile investment that can protect your investment, enhance its appearance, and extend its lifespan. By following the steps outlined in this guide, you can successfully seal your concrete patio and enjoy its benefits for years to come. Remember to choose the right sealant, prepare the surface properly, and apply the sealant carefully. With a little effort, you can transform your concrete patio into a beautiful and durable outdoor living space. Understanding how to seal concrete patio properly will result in a long lasting and attractive outdoor space. Don’t hesitate to consult with a professional if you have any questions or concerns. [See also: Choosing the Right Concrete Sealer for Your Project] [See also: Concrete Patio Maintenance Tips] [See also: Repairing Damaged Concrete Patios]
