How to Wire Landscape Lighting: A Comprehensive Guide
Enhancing your outdoor space with landscape lighting not only adds aesthetic appeal but also improves safety and security. Knowing how to wire landscape lighting correctly is crucial for a successful and long-lasting installation. This comprehensive guide will walk you through the entire process, from planning and choosing the right components to safely installing and maintaining your landscape lighting system. Whether you’re a seasoned DIY enthusiast or a beginner, understanding the fundamentals of how to wire landscape lighting will empower you to create a stunning outdoor environment.
Planning Your Landscape Lighting System
Before you even think about wires and transformers, meticulous planning is key. Consider the areas you want to illuminate, the desired effect (e.g., highlighting architectural features, path lighting, or creating a cozy ambiance), and the types of fixtures you’ll be using. A well-thought-out plan will save you time and headaches down the road.
Determine Your Lighting Needs
Start by sketching a rough layout of your property. Mark the areas you want to light, such as pathways, gardens, trees, or patios. Think about the purpose of each light. Is it for safety, aesthetics, or both? Different areas may require different types of fixtures and light intensities. For instance, pathway lighting typically requires lower wattage fixtures than spotlights aimed at trees or architectural features.
Choosing the Right Fixtures
The market offers a wide array of landscape lighting fixtures, each designed for specific purposes. Common types include:
- Path Lights: Designed to illuminate walkways and pathways, providing safety and guidance.
- Spotlights: Used to highlight specific features, such as trees, statues, or architectural details.
- Floodlights: Provide broad illumination for larger areas, such as patios or driveways.
- Well Lights: Installed in the ground to provide uplighting for trees or walls.
- Deck Lights: Designed for installation on decks and patios, offering subtle ambient lighting.
When selecting fixtures, consider factors such as material (e.g., copper, brass, stainless steel, or plastic), wattage, and style. Ensure the fixtures are designed for outdoor use and are weather-resistant.
Calculate Voltage Drop
Voltage drop is a critical consideration in how to wire landscape lighting. As electricity travels through wires, it loses some of its voltage. Excessive voltage drop can cause lights to dim or fail to operate properly. To minimize voltage drop, use the correct gauge of wire for the length of the run and the wattage of the fixtures. Online calculators and charts are available to help you determine the appropriate wire gauge.
Gathering Your Materials and Tools
Once you have a plan, it’s time to gather the necessary materials and tools. This will ensure a smooth and efficient installation process.
Essential Materials
- Low-Voltage Transformer: Converts standard household voltage (120V) to low voltage (typically 12V or 14V) for safe outdoor use.
- Landscape Lighting Fixtures: Choose the fixtures that suit your needs and design.
- Low-Voltage Wire: Use direct burial low-voltage wire, typically 12-gauge or 14-gauge, depending on the length of the run and the wattage of the fixtures.
- Wire Connectors: Use waterproof wire connectors designed for direct burial to ensure secure and weather-resistant connections.
- Timer or Photocell (Optional): Allows you to automatically turn the lights on and off based on time or ambient light levels.
- PVC Conduit (Optional): Provides extra protection for wires in high-traffic areas or where they are exposed to potential damage.
Necessary Tools
- Wire Strippers: To remove insulation from wires without damaging the conductors.
- Wire Cutters: To cut wires to the desired length.
- Screwdrivers: To tighten screws on fixtures and connectors.
- Pliers: To grip and manipulate wires.
- Shovel or Trenching Tool: To dig trenches for burying wires.
- Multimeter: To test voltage and continuity.
- Voltage Tester: To ensure power is off before working on electrical connections.
- Waterproof Tape: To further seal wire connections.
Step-by-Step Guide: How to Wire Landscape Lighting
Now, let’s dive into the actual wiring process. Follow these steps carefully to ensure a safe and successful installation. Remember to always prioritize safety and consult with a qualified electrician if you have any doubts or concerns.
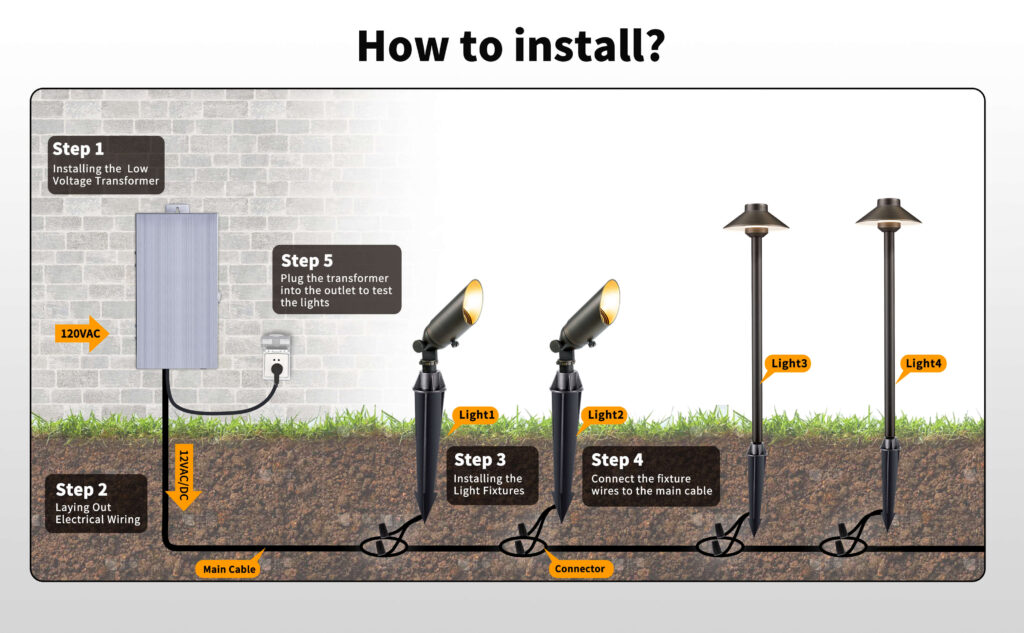
Step 1: Install the Transformer
The transformer is the heart of your landscape lighting system. Choose a location that is close to a GFCI-protected outdoor outlet and protected from the elements. Mount the transformer securely to a wall or post, following the manufacturer’s instructions. Connect the transformer to the GFCI outlet. Ensure the power is OFF at the breaker before making any electrical connections.
Step 2: Lay Out the Wires
Dig shallow trenches (typically 6-8 inches deep) along the planned route for your wires. Lay the low-voltage wire in the trenches, leaving enough slack at each fixture location for connections. Consider using PVC conduit in areas where the wires might be exposed to damage or high traffic.
Step 3: Connect the Fixtures
At each fixture location, strip the ends of the low-voltage wire and connect them to the fixture’s wires using waterproof wire connectors. Ensure the connections are secure and properly sealed to prevent corrosion and water damage. Many fixtures have built-in connectors, simplifying the process. Always follow the fixture manufacturer’s instructions.
Step 4: Connect the Wires to the Transformer
Run the low-voltage wires back to the transformer. Strip the ends of the wires and connect them to the appropriate terminals on the transformer. Most transformers have multiple terminals to accommodate different wattage loads. Refer to the transformer’s instructions to determine the correct terminals for your system. A good understanding of how to wire landscape lighting includes knowing your transformer capabilities.
Step 5: Test the System
Before burying the wires, test the system to ensure everything is working correctly. Turn on the power at the breaker and check each fixture to see if it lights up. If any fixtures are not working, check the connections and the voltage at the fixture. Use a multimeter to verify the voltage at each fixture. If the voltage is too low, you may need to use a heavier gauge wire or move the fixture closer to the transformer.
Step 6: Bury the Wires
Once you’ve confirmed that the system is working correctly, bury the wires in the trenches. Backfill the trenches with soil and tamp it down firmly. Be careful not to damage the wires during this process. Consider adding a layer of mulch or decorative stone to conceal the wires and enhance the appearance of your landscape.
Troubleshooting Common Issues
Even with careful planning and installation, you may encounter some common issues with your landscape lighting system. Here are some troubleshooting tips:
- Lights Not Working: Check the power supply, the transformer, and the connections. Use a multimeter to verify the voltage at the fixture.
- Dim Lights: This is often caused by voltage drop. Use a heavier gauge wire or move the fixture closer to the transformer.
- Flickering Lights: This could be caused by loose connections or a faulty transformer. Check the connections and replace the transformer if necessary.
- Lights Turning On and Off Randomly: This could be caused by a faulty timer or photocell. Check the timer or photocell settings and replace it if necessary.
[See also: Landscape Lighting Design Ideas]
[See also: Choosing the Right Landscape Lighting Fixtures]
Maintaining Your Landscape Lighting System
To ensure your landscape lighting system continues to function properly for years to come, regular maintenance is essential.
Regular Cleaning
Clean the fixtures regularly to remove dirt, debris, and insect nests. Use a mild detergent and a soft cloth to clean the lenses and housings. Avoid using harsh chemicals or abrasive cleaners, as they can damage the finish.
Check Connections
Periodically check the wire connections to ensure they are still secure and properly sealed. Replace any corroded or damaged connectors. Apply waterproof grease to the connections to prevent future corrosion.
Replace Bulbs
Replace burned-out bulbs promptly. Use the correct type and wattage of bulb for each fixture. Consider upgrading to LED bulbs, which are more energy-efficient and have a longer lifespan.
Inspect Wires
Inspect the wires for any signs of damage, such as cuts, abrasions, or rodent damage. Repair or replace any damaged wires immediately. If you suspect rodent damage, consider using rodent-resistant wire.
Understanding how to wire landscape lighting empowers you to create a beautiful and functional outdoor space. By following these guidelines, you can ensure a safe, reliable, and long-lasting lighting system. Remember to always prioritize safety and consult with a qualified electrician if you have any doubts or concerns. With the right knowledge and tools, you can transform your landscape into a stunning nighttime oasis. The process of how to wire landscape lighting, while seemingly complex, becomes manageable with careful planning and execution. Mastering how to wire landscape lighting enhances your property’s value and appeal. Learning how to wire landscape lighting also improves your home maintenance skills. Proper how to wire landscape lighting techniques ensure safety and longevity. Knowing how to wire landscape lighting allows for customized outdoor lighting solutions. Successfully understanding how to wire landscape lighting will lead to a beautiful outdoor space. The key to how to wire landscape lighting is planning and using the correct materials. Many homeowners find how to wire landscape lighting a rewarding DIY project. Finally, remember that if you are unsure about how to wire landscape lighting, consulting a professional is always a good idea.
